Showing posts with label blogger tips and tricks. Show all posts

Friday, 7 June 2013

How to Add Countdown Clock Widget to Blogger?


Countdown Clock Widget For Blogger
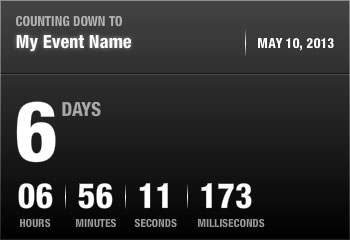
If you are organizing an event and want to display days left for that event to your audience or blog readers, then you must need a countdown clock widget that runs backwards to show remaining days for the event you are going to organize. Today, in this tutorial I'll tell you how you can add a countdown clock widget to your website or blog. This gadget will work fine for websites as well as blogs. You can put it anywhere you want. There is no need for any specialization. You just need to follow some simple steps to add this stylish widget to your blog. So, let start today's tutorial.

Adding Countdown Clock Widget to Blogger


We will use a website that provides us three options like Website Countdown WidgetsCountdown Web Pages, and Countdown Clock Devices. You can use anyone for your site. In this tutorial we will discuss about Website Countdown Widget. So, follow below steps to start the work.
  1. First go to CountingDownTo.com.

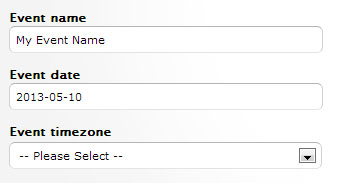
  2. Now you will see a very simple form with three fields Event name, Event date, Event Timezone. Fill all the three fields.

  3. countdown clock

  4. There are some advance options available that you can use to customize your gadget's look and feel.
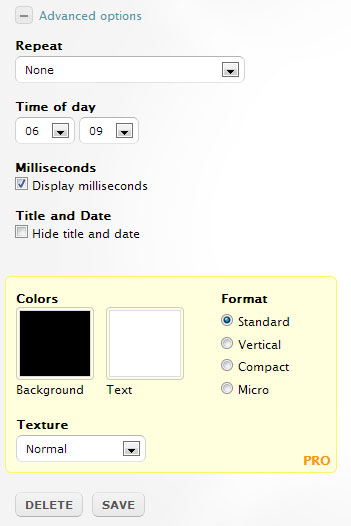
  5. countdown clock for blog

  • Repeat: How frequently you want to repeat the countdown count.
  • Time of day: Enter the exact time of the event. By entering the time, gadget will show more accurate time left.
  • Milliseconds: Check this box if you want to show milliseconds in your gadget.
  • Title and Date: Check this box if you don't want to show event name and date at the top of the countdown clock.
  • After that you can change its color and format.
  1. Once you satisfied with your gadget's design and format, then simply click on the EMBED button at the right side of the gadget's preview.

  2. add countdown clock

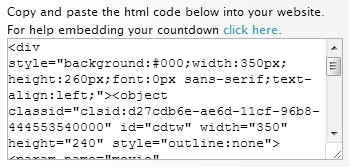
  3. Now copy the entire code from the box and paste it into new HTML/JavaScript gadget in your blog.
  4. clock widget
  5. That's it.

Final Words


This was the very easy tutorial on how to add countdown clock widget in blogger. You can place this gadget into your blog sidebar or in footer area. It will add more functionality to your blog. Please let me know how you feel about this gadget. 

Google Plus Pop Up Lightbox Widget For Blogger


google plus pop up
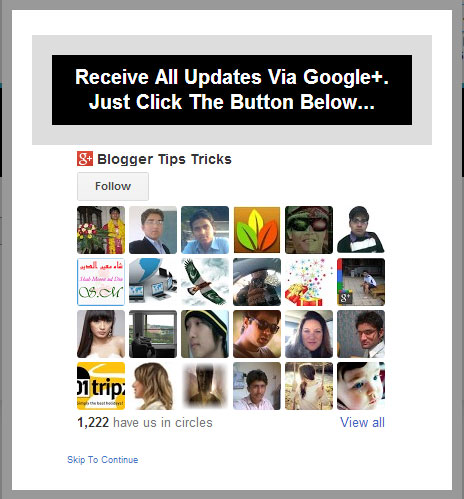
Friends after my previous post onhow to create Google Plus page for blogger, now I bring a very interesting gadget for you i.e Google Plus Pop Up gadget. This gadget is same as facebook pop up. Most of bloggers and webmasters use facebook pop up for their blog to get more page likes and to increase their page fans but now Google plus ones are also important same as facebook likes. This widget will help you to increase your page followers on G+. The feature of Google Plus Lightbox style pop up widget is that it load very fast in all browsers and easy to install. Mostly pop up widgets come with jQuery that slow down our blog speed but this widget have no such issues so don't worry about your blog load time. Let see how to add this widget into blogger blog.

Add Google Plus Lightbox Pop up in Blogger

  1. Go to blogger dashboard >> Layout
  2. Add a Gadget >> HTML/JavaScript
  3. Now paste the below code in it.


  4. <!-- This Is A CopyRight Code.It Is Free To Use But With HTML Design Code.
    If AnyOne Found To Be Changing This Code Should Be Under Legal Action Via DMCA. -->
    <style type="text/css">
    /***********************************************
    * CSS POP-UP With Light Box Effect- © EXEIdeas (www.exeideas.com)
    * This notice must stay intact for use.
    * Visit http://www.exeideas.com/ for full source code.
    ***********************************************/
    * html #exestylepopupdiv {position:absolute;}
    #exestylepopupdiv {display:block; top:0px; left:0px; width:100%; height:100%; position:fixed; background-image:url('https://blogger.googleusercontent.com/img/b/R29vZ2xl/AVvXsEggmsvmw79kAxiFYK-W16Ec06-9F2FApc6k5S5l_Ec90ztAVqpICCzg5jUsCjWcbCgtQq_AtKzIshJgR0oKSbqVPcp9M43yhP1N_7lwAp7pHgBGfYm9cvmOYiWduFVXU6LrOYxAmOYksA/s128/exeideasopacity0.5.png');margin:0; overflow-y:auto;}
    #exestylepopup {z-index:9999;background-color: #fff; overflow:none;}
    .exestylepopup {width:400px; height:440px; position:fixed; top:45%; left:50%; margin-top:-220px; margin-left:-200px; border: 10px solid #999; padding: 20px;}
    .exe-title {background:#000;color: #fff;font-size: 20px !important;font-weight:bold;margin:5px 0;border:20px solid #ddd;padding:10px;line-height:25px; font-family:arial !important;}
    </style>
    <!--[if lte IE 6]>
    <style type="text/css">
    /*<![CDATA[*/
    html {overflow-x:auto; overflow-y:hidden;}
    /*]]>*/
    </style>
    <![endif]-->
    <div id="exestylepopupdiv">
    <div id="exestylepopup" class="exestylepopup">
    <center><h3 class="exe-title">Receive All Updates Via Google+. Just Click The Button Below...</h3></center>
    <center>
    <div class="g-plus" data-action="followers" data-height="300" data-href="https://plus.google.com/115414872155487135762" data-source="blogger:blog:followers" data-width="310">
    </div>
    <script type="text/javascript">
    (function() {
    window.___gcfg = {'lang': 'en'};
    var po = document.createElement('script');
    po.type = 'text/javascript';
    po.async = true;
    po.src = 'https://apis.google.com/js/plusone.js';
    var s = document.getElementsByTagName('script')[0];
    s.parentNode.insertBefore(po, s);
    })();
    </script>
    </center>
    <br />
    <center style=" float:right; margin-right:35px; font-size:9px;" >Powered By <a style=" font-size:9px; color:#3B78CD; text-decoration:none;" href="http://www.exeideas.com">EXEIdeas</a></center>
    <center style=" float:left; margin-left:35px; font-size:9px;cursor:pointer;" ><a style=" font-size:9px; color:#3B78CD; text-decoration:none;" onmouseup="document.getElementById('exestylepopupdiv').style.display='none'">Skip To Continue</a></center>
    </div>
    </div>
    <!-- This Is A CopyRight Code.It Is Free To Use But With HTML Design Code.
    If AnyOne Found To Be Changing This Code Should Be Under Legal Action Via DMCA. -->
    Code Credit: EXEideas

  5. Change the highlighted text with your Google plus page URL.
  6. Now save the gadget and you are done.
Now visit your blog and check new Google Plus lightbox pop up. 


Feedback!


Please post your feedback about this gadget. If you like this gadget then please follow me of G+. It will help me to share new and innovative blogging tips and tricks with you.  Thanks!

Thursday, 6 June 2013

Social Sharing Buttons Gadget For Blogger


social sharing buttons

Social Media is really a good media to increase traffic to blog. Mostly bloggers and webmasters trust on social media sites like facebook, twitter and now Google+ also. They all are the great source of free and targeted traffic. Strong social media presence helps to improve our blog ranking in all the search engines. We should share our blog posts to these sites to get traffic and visitors to our blog. We should also include social media sharing buttons to our blog so that our readers can share our blog posts and give us valuable and natural backlink. To make this task easy for our readers today I bring a very stylish and fancy social sharing buttons for blogger which includes Facebook, Twitter, Google Plus, Pinterest, StumbleUpon, Delicious, LinkedIn and Reddit. Let's start adding this gadget into blogger blog.

Social Share Buttons for Blogger

  1. Go to your blogger dashboard.

  2. Click Edit HTML > Proceed > Tick Expand Widget Templates Box.

  3. Press Ctrl+F and search below code in your template.

  4. <data:post.body/>

  5. Now paste the below code just after that.


  6. <b:if cond='data:blog.pageType == &quot;item&quot;'>   <div class="sharelordhtml"> <center><div class="headinglordhtml">Like the Post? Do share with your Friends.</div>     <ul class='social' id='cssanimation'>     <li class='facebook'>     <a expr:href='&quot;http://www.facebook.com/share.php?v=4&amp;src=bm&amp;u=&quot; + data:post.url + &quot;&amp;t=&quot; + data:post.title ' onclick='window.open(this.href,&apos;sharer&apos;,&apos;toolbar=0,status=0,width=626,height=436&apos;); return false;' rel='nofollow'><strong>Facebook</strong></a>     </li>     <li class='twitter'>     <a expr:href='&quot;http://twitter.com/home?status=&quot; + data:post.title + &quot; -- &quot; + data:post.url ' rel='nofollow' target='_blank'><strong>Twitter</strong></a>     </li>     <li class='googleplus'> <a expr:href='&quot;https://plusone.google.com/_/+1/confirm?hl=en&amp;url=&quot; + data:post.url' onclick='window.open(this.href,&apos;sharer&apos;,&apos;toolbar=0,status=0,width=626,height=436&apos;); return false;' rel='nofollow' target='_blank'><strong>Google+</strong></a>     </li>     <li class='pinterest'> <a href='javascript:void((function()%7Bvar%20e=document.createElement(&apos;script&apos;);e.setAttribute(&apos;type&apos;,&apos;text/javascript&apos;);e.setAttribute(&apos;charset&apos;,&apos;UTF-8&apos;);e.setAttribute(&apos;src&apos;,&apos;http://assets.pinterest.com/js/pinmarklet.js?r=&apos;+Math.random()*99999999);document.body.appendChild(e)%7D)());' rel='nofollow' target='_blank'><strong>Pinterest</strong></a>     </li>     <li class='stumbleupon'>     <a expr:href='&quot;http://www.stumbleupon.com/submit?url=&quot; + data:post.url + &quot;&amp;title=&quot; + data:post.title ' rel='nofollow' target='_blank'><strong>StumbleUpon</strong></a>     </li>     <li class='delicious'>     <a expr:href='&quot;http://delicious.com/post?url=&quot; + data:post.url + &quot;&amp;title=&quot; + data:post.title ' rel='nofollow' target='_blank'><strong>Delicious</strong></a>     </li>     <li class='linkedin'>     <a expr:href='&quot;http://www.linkedin.com/shareArticle?mini=true&amp;url=&quot; + data:post.url + &quot;&amp;title=&quot; + data:post.title + &quot;&amp;summary=&amp;source=&quot;' rel='nofollow' target='_blank'><strong>LinkedIn</strong></a>     </li>     <li class='reddit'>     <a expr:href='&quot;http://reddit.com/submit?url=&quot; + data:post.url + &quot;&amp;title=&quot; + data:post.title ' rel='nofollow'><strong>Reddit</strong></a>     </li>     <li class='technorati'>     <a expr:href='&quot;http://technorati.com/faves?add=&quot; + data:post.url ' rel='nofollow' target='_blank'><strong>Technorati</strong></a>     </li>     </ul></center></div>   <link href='http://fonts.googleapis.com/css?family=Englebert' rel='stylesheet' type='text/css'/>​ <style> ul.social { list-style:none; display:inline-block; margin:15px auto; }  ul.social li { display:inline; float:left; background-repeat:no-repeat; }  ul.social li a { display:block; width:50px; height:50px; padding-right:10px; position:relative; text-decoration:none; }  ul.social li a strong { font-weight:400; position:absolute; left:20px; top:-1px; color:#fff; z-index:9999; text-shadow:1px 1px 0 rgba(0,0,0,0.75); background-color:rgba(0,0,0,0.7); -moz-border-radius:3px; -moz-box-shadow:0 0 5px rgba(0,0,0,0.5); -webkit-border-radius:3px; -webkit-box-shadow:0 0 5px rgba(0,0,0,0.5); border-radius:3px; box-shadow:0 0 5px rgba(0,0,0,0.5); padding:3px; }  ul.social li.facebook { background-image:url(https://blogger.googleusercontent.com/img/b/R29vZ2xl/AVvXsEjMcWjjZpxri2TXnaAdcdy0RqyeAnxpZ6NnovkbulQLUNWI5IiVUZD7RsSE2npP8R-WO-_u9grVknDi7ntAxFxHgToGprjTxjjLizLSMuXBWcRUXZaSe_kAFEKVSgdCbBbTHLlQo10EHUM/s50/facebook.png); }  ul.social li.twitter { background-image:url(https://blogger.googleusercontent.com/img/b/R29vZ2xl/AVvXsEhDVgJyS3iOBJ_vKh2DscVxY6rHqeWK4exSPtADqRg3cNJ3Xs6Iq13fyk-Z4VMKEaRC0qZVOD8fuDnnMuyyUCXGR04CZ5s_mYXRrbHbXuuFtbdLZuXBjAXf1tIGMWdtz45MAenvoW7bDJ0/s50/twitter.png); }  ul.social li.googleplus { background-image:url(https://blogger.googleusercontent.com/img/b/R29vZ2xl/AVvXsEiiryaauRz2ahEo6vyntiRex4Szkgyr4Ydc34cRNDbNnclytWjJD3EYCI0TrKT9Xudi9_UadUVsTTmBT2viKWJIvZ9-7QymCupp4M_zsUFmwLqgbLhPdykj-FtZvftlWbK9O538XE6C8R8/s50/google%252B.png); }  ul li.pinterest { background-image: url(https://blogger.googleusercontent.com/img/b/R29vZ2xl/AVvXsEjkkH8-sy31KACakQ1mmICANPLUzW7zzxLQFY94Lvpxf58G1FEi1oplNjhW_EC5pO0qqhSjUx11W-jPFygyyAft9cAe3CZGopKfhlwdmDNQBmCUQG5HDZ0OjksV3l1UnW3ZqXlquCUlehc/s50/pinterest.png); }  ul.social li.stumbleupon { background-image:url(https://blogger.googleusercontent.com/img/b/R29vZ2xl/AVvXsEiSJvCL-K67anromjyZJiPMc8AYP4zAjXlQNmovFVpcaQpmVFT71EDhGi5Zki4lOwFiLI7P6N10qaVlTMe81pxSTbrieDpaU84rzYBna85lICq-DMsO1VFbmNJ5LpljHpiYgTFss2qxQhs/s50/stumbleupon.png); }  ul.social li.delicious { background-image:url(https://blogger.googleusercontent.com/img/b/R29vZ2xl/AVvXsEgAqtINdunYLP_f9j_wi2p4aiycBEmv8q-FFZucP8q25q1x-FOfNcog62wWiYZi1hvwCz7sCt_d2ffJaycJ7BaHdZno2hFQBpnNOkeAIY-89P0KJl0JzFFDeXjjAqtw2SE35RAvF2LLFgw/s50/delicious.png); }  ul.social li.linkedin { background-image:url(https://blogger.googleusercontent.com/img/b/R29vZ2xl/AVvXsEhuyUWYa0-Uphxz_zjwIz2T7ElP2v1OTfQEwboK0hQwrT0giEIwpbGgxPSLPbPsiyAMMmwadaHz2nfabE26GwQOwZbX1WDbQJAk29MkAahOolexZLtBVSbO-pdDcJj-eJ7fL2Cn18iBV6o/s50/linkedin.png); }  ul.social li.reddit { background-image:url(https://blogger.googleusercontent.com/img/b/R29vZ2xl/AVvXsEiY0Rhe6cAGiMPb9LnQOShAf4rk-jswbRb6ts5PVyqCQTZz914SXxsyvbHuXmUavwF9ZXqSB-VLyB2pAbuobjULa9hcQsf2tWWIuFSVchOnhPAyBur4Oq0HC9mf98BhJWVotMqE1WbqBDc/s50/reddit.png); }  ul.social li.technorati { background-image:url(https://blogger.googleusercontent.com/img/b/R29vZ2xl/AVvXsEgqZ-aJ6wJh2V2fy9yJzask59xBCt7DnGpdzbCnLNhuxPseSCcwbCcakzIX3qMV50oENUYXoXe6EWWHeom3W3-eSDF-Phk-cfYwdKocGNeTd_GZaBzHh8jlB0WlkIRdebG83Em3lknsMzoZ/s1600/TBI-technorati.png); }  #cssanimation:hover li { opacity:0.2; }  #cssanimation li { -webkit-transition-property:opacity; -webkit-transition-duration:500ms; -moz-transition-property:opacity; -moz-transition-duration:500ms; }  #cssanimation li a strong { opacity:0; -webkit-transition-property:opacity, top; -webkit-transition-duration:300ms; -moz-transition-property:opacity, top; -moz-transition-duration:300ms; }  #cssanimation li:hover { opacity:1; }  #cssanimation li:hover a strong { opacity:1; top:-10px; } .headinglordhtml{     font-size:25px;     font-family: 'Englebert', sans-serif; } .sharelordhtml{   border-top:30px solid #3873CC;      padding:16px;         -webkit-box-shadow: 0px 7px 9px rgba(50, 50, 50, 0.75); -moz-box-shadow:    0px 7px 9px rgba(50, 50, 50, 0.75); box-shadow:         0px 7px 9px rgba(50, 50, 50, 0.75);     transition: background .777s; -webkit-transition: background .777s; -moz-transition:background .777s; -o-transition: background .777s; -ms-transition: background .777s;     background:#D9D6FF; }  .sharelordhtml:hover {         background:white;  }  ​ </style>  </b:if>

  7. Now click on save template button.

  8. You are done!

Wednesday, 5 June 2013

Minimum Requirements For Blogspot To be Approved For Google Adsense

minimum requirements for blogspot:
Earn with Adsense
In this Post i will let you know How to Get Google Adsense and what are the at least criteria to be successfully Approved, there are some Requirements that you must have in your Blogspot Site.Google has some constraints(limitations,checks) on Blogspot domains to have adsense 

Blogspot Adsense
What are the Minimum Requiments:
  1. Your Blog(Blogspot) must be 6 Months Old.
  2.  Your Blog must have sufficient Posts. more than 80 
  3. Your Blog does not have all copy right posts. at least some posts you written yourself.
  4. Your Blog content doest not include such contents which attract users most.
  5. For examples: chat rooms, Tv channels, etc.
  6. Your Blog posts/pages does not include site under ""construction  or coming soon posts"
When i can Add it? :
You can add AdSense to just about any blog or Website, so long as you follow Google's Terms of Service.
It is especially easy to ad AdSense to Blogger.
Now Let Start to Apply adsense For Blogger(Blogspot)
  1. Log into Blogger.
  2. Go to Template: Page Elements(layout).
  3. Add Gadget and select Adsense.
  4. Now Apply to Google Adsense. Click Here To Apply Now
  5. And Fill the Form and apply.
  6. Google will review your application and will respond you with 7 days.
  7. Good Luck!
Very Important Note For Pakistanis ,Indians and for some other countries 
if you are living in such a place where there are not street numbers.
You must have to add some street number's, and Don't worry if it is not correct. just include some numbers, However you must correct add your Location. Your City , post office and village.
i am saying again you must have to add some number in the address even if it is wrong otherwise you will not be approved.

Let say you an example.
City Dehli post office: Name of post office, 222.

Have a still problem. comments what's on your mind?
You are so Amazing!